Be A Good Muslim Engineer

This blog shares bout life, as what we learn from Quran and sunnah that guide us how to supposed to be a good muslim. Islam and Science are unity, science nowadays says what Quran explained so long time before scientists found their invention.

Tuesday, November 3, 2015

Perbaikan Stavol Kyowa yang Output Tegangannya Terlalu Tinggi


Kejadian ini pernah saya alami ketika saya mencoba charger laptop yang baru saya beli namun baru beberapa menit charger langsung rusak setelah di tancapkan ke stabilizer. Tak ingin kehilangan masa garansi maka charger tersebut saya tukarkan ke tokonya. Sambil memikirkan penyebab kerusakan saya ngecharge HP melalui stavol tersebut. Eh ternyata charger HP saya tak lama kemudian juga rusak. Seketika langsung saya ukur output tegangan dari stavolt. Astaghfirullah, ternyata output stavolt yang seharusnya di kisaran 220 V melonjak hingga 240 V.

Tanpa banyak cincong, langsung saya buka stavolt merk Kyowa SVR-1000N jenis servo motor control. Saya cek pergerakan brush yg nempel di trafo, bisa bergerak namun derajat putarannya terlalu tinggi. Saya cek modul control, di situ ada trimpot. Setelah trimpot diputar, output tegangan stavolt akhirnya bisa disesuaikan.


Labels:

Saturday, May 30, 2015

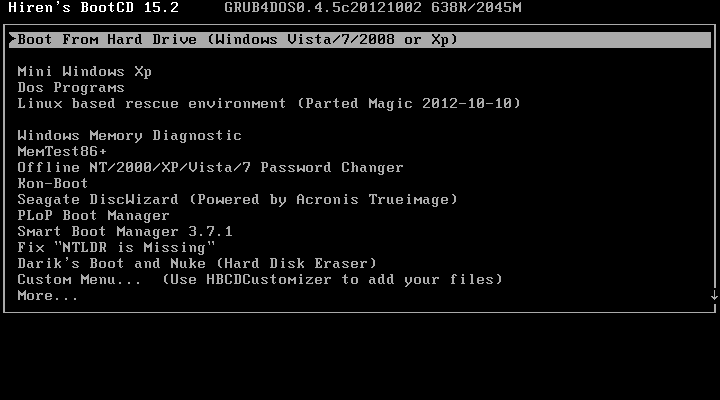
Download Hiren's Boot CD 15.2

Hiren 's BootCD (JUGA dikenal sebagai HBCD) adalah CD perangkat lunak bootable Yang Berisi sejumlah Program Diagnostik seperti agen partisi, Tolok ukur kinerja SISTEM, disk yang kloning Dan Alat pencitraan, Data Alat pemulihan, MBR tools , BIOS tools, Dan BANYAK Before untuk memperbaiki berbagai masalah Komputer. HBCD dapat dianggap sebagai Alat Yang berharga untuk digunakan Dalam, pemecahan masalah Dan pemulihan Bahasa Dari Komputer.


Ditambahkan Softwares baru, Fungsi Diperbarui:
  1. BattStat 0.99b: Monitor Status Baterai dan manajemen daya freeware untuk Windows 7/Vista/XP/2000 x86/x64.
  2. BrowsingHistoryView 1.05: Untuk melihat data sejarah Internet Explorer, Mozilla Firefox, Google Chrome, dan Safari Web browser di satu meja.
  3. ClearLock 1.4.0: Untuk mengunci desktop Anda dengan lapisan transparan, memungkinkan Anda untuk melihat apa yang terjadi pada desktop Anda dan pada saat yang sama mencegah akses ke komputer tanpa password yang tepat.
  4. DRevitalize 1.2: Perbaikan bad sector (cacat fisik) pada hard drive dengan menghasilkan urutan khusus sinyal tinggi dan rendah di sekitar area rusak secara fisik.
  5. EncFS 1.7.4: ini harus digunakan untuk layanan file backup aman online seperti Google Drive, Dropbox dan SugarSync sebagai enkripsi tidak menempati kontainer ukuran tetap dan program backup dapat menyalin file terenkripsi dan dapat diakses dari linux, iPhone / iOS dan android menggunakan BoxCryptor dan Cryptonite.
  6. ImDisk 1.6.0: Untuk membuat / me-mount virtual hard disk, floppy atau CD / DVD drive menggunakan file gambar atau memori sistem.
  7. MBRCheck 1.2.3: Cek legitimasi Master Boot Record (MBR) kode hard drive.
  8. McAfee Removal Tool 6.0.152.0: McAfee Consumer Product Removal Tool menghapus semua 2005-2012 versi produk McAfee.
  9. MiniXP: Ditambahkan / diperbarui Penyimpanan / LAN / WLAN driver dan perbaikan kecil lainnya, booting karya iso, jalan dapat diubah dalam HBCD \ XP \ X menggunakan notepad.
  10. Norton Removal Tool 20.0.0.21: SymNRT uninstall paling Norton AntiVirus, Norton Internet Security, Norton 360, Norton SystemWorks dan bahkan ketika gagal uninstaller untuk menghapusnya.
  11. Hapus Driver Non Hadir: Secara otomatis menghapus semua perangkat non-present/disconnected dari Windows dan sering dapat berguna untuk mencegah nakal / driver yang tidak perlu dari yang dimuat, driver pembersihan ketika Anda mengganti motherboard atau menggunakan cadangan gambar hardware yang berbeda.
  12. Tor Browser 2.2.39: Surfing internet secara anonim melalui enkripsi, bahkan situs https dapat diakses dengan aman di mana itu diblokir oleh ISP lokal Anda.
  13. WifiInfoView 1.05: jaringan informasi nirkabel termasuk Network Name (SSID), MAC Address, PHY Type (802.11g atau 802.11n), RSSI, Kualitas Sinyal, Frekuensi, Channel Number, Kecepatan Maksimum, Nama Perusahaan, Nama Router / Model dan banyak lagi.
  14. Jendela Product Key Update Alat 1.7: Alat ini dari microsoft untuk mengubah kunci ilegal / bajakan diinstal xp untuk legit kunci xp dari stiker di PC, bahkan jika itu adalah oem dan tidak retail / korporasi.

Labels:

Saturday, June 15, 2013

Trik Buat Rangkaian Pengaman Otomatis di Bengkel Elektronik


"Bagaimana caranya membuat stop kontak yang kalau ada komponen elektronika yang konslet tidak sampai men TRIP/njeglegkan kan mcb yang ada di meteran?"

Pertanyaan tersebut mungkin pernah terlintas di pikiran Anda yang suka oprek peralatan elektronik. Pernah saya sudah buat stop kontak kabel koloran yang saya kasih mcb 1 Amp tapi ternyata masih trip juga kalau konslet.

PLN dirumah saya pakai mcb 4 Amp. Saya pernah lihat ditukang lampu bekas, distop kontaknya ada bola lampu entah berapa watt saya kurang tau dan kalau terjadi konslet maka bola lampunya menyala tanpa men TRIP kan mcb di meteran pln. Dan setelah saya tanya katanya "RAHASIA" ....

Persiapan alat :

1. Lampu Bolam 100 W, lampu bolam harus 100 W agar rangkaian bisa bekerja.
2. Stop Kontak khusus untuk servis
3. Colokan Listrik (Steker Listrik)
4. Kabel secukupnya.

Cara Membuat Sekring Otomatis Dengan Lampu Bolam :

Intinya lampu Bolam 100 W itu di susun secara seri dengan servisan elektronik yang akan anda test. Ikuti aja gambar berikut ini : 


Cara kerja rangkaian :

Kalau alat elektronik yang kita test NORMAL, maka BOLAM akan nyala sebentar terus mati, dan alat elektronik akan bekerja dengan normal seperti biasa.

Tapi kadang waktu dicoba di monitor BOLAM akan nyala mati nyala mati, dst. Ini juga menandakan rangkaian power suply normal atau tidak konslet.

Kalau alat elektronik yang kita test KONSLET, maka BOLAM akan nyala terus.

Bolam yang digunakan 100 W karena daya Bolam harus diatas daya alat elektronik yang kita test.

Kalau daya Bolam dibawah daya alat elektronik yang kita test maka Konslet tidak Konslet, BOLAM akan menyala terus.

Labels: ,

Monday, September 17, 2012

Free Download Ingersoll Rand Centac C950 Manual

The Centac compressor is a centrifugal air compressor driven by an electric motor, a
steam turbine, gas engine, or diesel engine. The compressor and driver are direct coupled
and the entire unit is mounted on a common baseplate with its own lube system, control
system, and auxiliaries.
The compressor package contains:

      A main driver that directly drives a bullgear that is common to all stages.
     Compression stages consisting of an impeller mounted on its own shaft, enclosed
within a common cast iron casing.

     Rotors consisting of an integral pinion gear driven at its optimum speed by a common
bullgear.

      An intercooler that is mounted within each stage.
      A moisture separator and a moisture removal system are supplied after each cooler to
remove condensate.

      In some compressor configurations an integral aftercooler is also supplied as part of
the package.
Low-pressure designs will typically have fewer stages than the standard compressor. High-
pressure designs are also available.

Table of Contents
Section 1 Specifications
Section 2 Description
Section 3 Operation
Section 4 Maintenance
Section 5 Troubleshooting
Section 6 Parts & Service


DOWNLOAD

Labels: , ,

Thursday, August 16, 2012

Free Download Automotive Air ConditioningTraining Manual

CONTENTS
Section (1) Theory
Air Conditioning Training Manual
The Four Major Functions ------------------------------------------ 15
Understanding Heat ------------------------------------------------- 16
Change of State ----------------------------------------------------- 19
Pressure & Temperature Relationship --------------------------  20
The Ozone Layer---------------------------------------------------- 21
R134a Properties --------------------------------------------------- 22
Principles of Air Conditioning ----------------------------------------24

Section (11) System Types
CCTXV with Block Valve-------------------------------------------- 25
CCTXV with Parallel Flow Condenser-------------------------------  26
CCOT with Parallel Flow Condenser --------------------------------  27
CCOT TXV Dual System--------------------------------------------  28

Section (111) Components
Compressors -------------------- -------------------------------------29
Clutches -------------------------------------------------------------- 34
Lubrication ----------------------------------------------------------- 35
Condensers ---------------------- -------------------------------------36
Foam Seals ----------------------- ------------------------------------37
Condenser Electric Fans ---------------------------------------------- 37
Evaporators ---------------------- ------------------------------------38
Thermal Expansion  Valves --------------------------------------------39
Super Heat ----------------------- ------------------------------------41
Orifice Tubes -------------------- ------------------------------------ 42
Filter Drier Receivers -------------------------- -----------------------43
Accumulators ------------------------------------- --------------------44
‘O’ Rings ------------------------------------------------------------ 45
Hoses ------------------------------------------------- ----------------46
Charging Ports ------------------------------------ --------------------47
Wiring A/C systems --------------------------------------------------- 48
Blower Speed Controls ----------------------------------------------- 49
Compressor Cycling Control ---------------- ------------------------- 50
Protective Sensors --------------------------------------------------    54
Temperature Control ----------------------------------------------      60
Mode Control ------------------------------------- -------------------61
Electronic Temperature Control (ECC)- ------------------------------ 63

Section (1V) Retrofitting
Introduction                                                                         65
Procedures                                                                          66
Retro Chart                                                                         68

Section (V) Equipment
Charging                                                                              70
Combination Units                                                                71
Gauges                                                                                 72
Recovery & Recycle                                                             73
Vacuum Pump                                                                       74

Section (V1) Servicing
Refrigerant Safety------------------------------------------------------------- 75
Leak Detection ----------------------------------------------------------------76
Lubrication ----------------------------------------------------------------------79
Lubricating Oil -----------------------------------------------------------------80
System Flushing ---------------------------------------------------------------81
Preparation ----------------------------------------------------------------------82
Pressure Gauges ---------------------------------------------------------------83
Evacuation & Charging Procedure ------------------------------------- 84
Thermistor & Amplifier Testing -----------------------------------------86
Diagnostics ---------------------------------------------------------------------- 87
Diagnostics Hints --------------------------------------------------------------99

DOWNLOAD

Labels: , , ,

Wednesday, May 2, 2012

Free Ebook Commercial Refrigeration for Air Conditioning Technicians Second Edition

This book is written for refrigeration technicians, air-conditioning (AC)  technicians,
and advanced AC students. Commercial refrigeration, as a speci c subject, is taught
in only about 10 percent of the schools that have HVACR programs. As a result,
there are very few AC students or technicians exposed to this related technology.
The industry certainly needs technicians trained in AC. However, if AC technicians also
understand commercial refrigeration, they will be more valuable to their companies and
their customers.

The first six of the fourteen chapters combine both a review of refrigeration theory
and an introduction to how those principles are applied speci cally to commercial
refrigeration equipment. Wherever possible, refrigeration concepts are compared with
those of AC. This makes it easier for HVACR students and technicians to relate what
they already know to the eld of commercial refrigeration.

Chapter 7 applies the information in the rst six chapters to the troubleshooting
of nine common refrigeration system problems. It also includes a diagnostic chart for
the reader to use in class, as well as on the job. Chapter 8 on motor controls also has
its share of troubleshooting instructions. The commercial refrigeration industry has
been at the forefront of developing retro tting practices for replacing chloro uoro-
carbon (CFC) and hydrochloro uorocarbon (HCFC) refrigerants. Therefore, Chapter 9
covers retro tting, along with the other related practices of recovery, evacuation, and
charging.

Chapter 10 is an introduction to the fascinating world of supermarket refrigeration.
Chapters 11 and 12 deal with walk-ins, reach-ins, and ice machines. Chapter 13 is a
relatively short but important look at the role of the refrigeration technician in food
preservation and health issues.

Because many HVACR technicians eventually start their own companies, the last
chapter in this book deals with the business side of this industry. Even if most
 students have no immediate intention of becoming self-employed, this chapter pro-
vides a glimpse of what their employers deal with on a daily basis. By gaining
these insights, technicians can become a more supportive and vital part of their
organizations.

DOWNLOAD

Labels: , ,

Saturday, April 21, 2012

Toyota Yaris Air Cond Service Manual

Setelah hunting sana-sini, akhirnya nemuin juga service manual Air Conditioner buat mobil
DOWNLOAD

Labels:

Sunday, October 2, 2011

Haynes Techbook Automotive Heating & Air Conditioning


 Contents:
Chapter One   : Basic theory of air conditioning system operation
Chapter Two   : Basic air conditioning and heating system component
Chapter Three : Typical automotive air conditioning systems
Chapter Four  : Service and diagnostic tools
Chapter Five   : Heating and air conditioning system service and repair
Chapter Six     : Troubleshooting

Free Download Ebook Haynes Techbook Automotive Heating & Air Conditioning

Labels: ,

Sunday, September 4, 2011

BIOS password unlock Toshiba Satellite 1105 Notebook

PASSWORD TYPES

There are three varieties of passwords used on Toshiba notebook computers running Microsoft Windows:

BIOS Password (User Password)


Supervisor Password (used on some models)


Windows Logon Password


Both the BIOS and Supervisor password prompts appear immediately after the computer is started or restarted, or taken out of Standby mode. Once a BIOS or Supervisor password is set, the computer will only start Windows (or any other operating system) after that password is entered correctly.

Entering either a BIOS password or a Supervisor password permit normal use of the computer. The difference between them is that if the Supervisor password is set, it must be entered in order to change system settings. Exactly which settings require the Supervisor password permission varies from model to model. Knowing the Supervisor password makes it possible to change the BIOS password, without knowing it.

The BIOS and Supervisor passwords cannot be removed or changed unless you know the existing password(s). If you forget your BIOS or Supervisor password, you will have to have the password removed by a Toshiba Authorized Service Provider. Although the prompts for these two passwords have the same appearance, the passwords are set and removed differently. If both are set, the Supervisor password takes precedence.

The Windows password prompt appears while Windows is starting. With Windows 95, 98, and ME, this password is used only to support the customization of the Windows environment by each user, and the password prompt may be ignored by clicking Cancel or pressing the Esc key. The computer can then be used normally (though possibly with some limitations). With Windows XP, 2000, and NT, the password prompt is for a secure logon, meaning that it's not possible to skip over the password prompt (though it is possible to leave the password prompt blank -- a 'null' password).

B I O S P A S S W O R D


Setting the BIOS Password

There are two main varieties of BIOS used in Toshiba notebooks, each with its own unique method for setting and disabling a password. First, determine which type of BIOS is used in your notebook model, as follows:

Starting with the computer fully off, turn it on by pressing and releasing the power button. Immediately and repeatedly tap the Esc key. If the message "Check System and press the F1 key" appears, then follow the "Esc key BIOS" procedure, below.

If the computer ignores the Esc key when it's powered-on, or if you see an invitation to press the F2 key to enter the BIOS Setup utility, follow the "F2 key BIOS" procedure, below.

Almost all Toshiba notebook computers will respond to either the Esc key or the F2 key when they're first powered-on. The Toshiba HWSetup program (found in the Windows Control Panel) may also be used for setting and disabling the BIOS password. See the HWSetup procedure, below.

To set a BIOS password, start the BIOS Setup program and enter a new password into the password field, per the detailed instructions below. Once a BIOS password is set, it will be necessary to enter it whenever the computer is started, restarted or reset. Choose a password that you can reliably recall, or make note of it in a secure location. If you forget the BIOS password, only a Toshiba Authorized Service Provider can remove it.

ESC key BIOS Password setting procedure

1. Starting with the computer fully off, turn it on by pressing and releasing the power button. Immediately and repeatedly tap the Esc key, until the message "Check system. Then press (F1) key" appears on the screen.

2. Press the F1 key. The BIOS setup program will appear.

3. Using the arrow keys or the tab key, move to the Password field, and highlight NOT REGISTERED.

4. Press the spacebar, and then enter a new password at the "Password = " prompt. Press the Enter key.

5. Enter the password again when the Setup program prompts for it, and press Enter. The Password field will change to REGISTERED.

6. Press the End key and then the Y key to save changes and exit the BIOS Setup program.

F2 key BIOS Password setting procedure

1. Starting with the computer fully off, turn it on by pressing and releasing the power button. Immediately and repeatedly tap the F2 key.

2. The BIOS setup program should appear. If Windows starts, shut down the computer and try step 1 again.

3. Use the arrow keys to move to the Security tab.

4. Use the arrow keys to select "Set User Password". (This 'User Password' is equivalent to what is otherwise called, in this document, a 'BIOS Password'.)

(It may be necessary to set a supervisor password before setting a user password. A Supervisor Password may be thought of as a backup mechanism -- if a User Password is forgotten, the Supervisor Password will allow access to the computer. The next section describes how to set a Supervisor Password.)

5. Press the F5 or the F6 key to navigate to the Password section. Type in a new password at the "Password = " prompt, and then press the Enter key.

6. Enter the password again when the Setup program prompts for it, and press Enter. The password field will now change to indicate that a password has been entered.

7. Optionally, set the Password on Boot feature to 'Enable'. Otherwise the computer may not prompt for the password at startup.
8. Press the F10 key to save changes and exit the BIOS Setup program.

=================================================================

Removing the BIOS Password

Follow one of the procedures below to remove a BIOS Password. See the section 'Setting the BIOS Password', above, to determine which type of BIOS your computer has. Once the password is removed, the computer will no longer prompt for a password when it's started. Removing the BIOS Password requires you to enter it first. If you cannot recall the BIOS Password, only a Toshiba Authorized Service Provider can remove it.

ESC Key BIOS Password removing procedure

1. Starting with the computer fully off, turn it on by pressing and releasing the power button. Immediately and repeatedly tap the Esc key. The computer will display the "Password = " prompt.

2. Enter the correct password, and press the Enter key. The computer will display "Valid password entered, system is now starting up. Check system. Then press (F1) key"

3. Press the F1 key. The BIOS setup program will appear.

4. Using the arrow keys or the tab key, move to the password field, and highlight REGISTERED.

5. Press the spacebar, enter the correct password, and press the Enter key. The Password field will change to NOT REGISTERED.

F2 Key BIOS Password removing procedure

1. Starting with the computer fully off, turn it on by pressing and releasing the power button. Immediately and repeatedly tap the F2 key. The unit will display the "Password = " prompt.

2. Enter the correct password, press the Enter key. (You may need to press the F2 key after you hit the enter key.)

3. The BIOS setup program will appear.

4. Using the arrow keys, move to the Security tab, and to Set User Password.

5. Press the F5 or the F6 key to navigate to the Password section. Enter the current password at the Old Password prompt, and press Enter. At the New Password prompt, press Enter (without typing anything into the password field). At the Confirm Password prompt, press Enter again (without typing anything into the password field). The password should now be removed.

6. Press F10 to save and exit from the BIOS Setup program.

HWsetup BIOS Password removing procedure (This method works for most notebook models.)

1. In Windows, click Start, then Control Panel (or Start, then Settings, then Control Panel).

2. In Control Panel, click on the icon for HWSetup or Toshiba Hardware Setup.

(If neither of these icons are present, download and install the Toshiba utilities for your model from the Service and Support Website, or use the appropriate BIOS Setup procedure above.)

3. Click on the Password tab.

4. Click to select Registered. Alternately, there may be a choice for User or Supervisor Password. Select one or the other.

5. Enter the current password at the "Password = " prompt, press the Enter key. If the HWSetup app prompts for the current password and then twice for the new password, simply press the enter key three times after entering the current password. By pressing the Enter key only, you are selecting no password.

6. HWSetup should now show that the password is Unregistered, which means there is no password set.

7. Close the HWSetup program.

NOTE: If there is a prompt for a password when the computer is started, even though the password field in the BIOS Setup program is blank, then a Supervisor password has been set. Follow the steps below to remove a Supervisor password.

Source : http://www.hardwareanalysis.com/content/topic/18140/?o=60

Labels:

Friday, December 10, 2010

Cara Service Monitor LCD Samsung 732NW ( no display )

(c) cahsaren 2010
Pernah suatu kali monitor PC saya (LCD Samsung 732NW) mengalami blank alias tidak menampilkan gambar apapun  meskipun lampu power monitor menyala. Awalnya saya cek RAM PC, lalu kabel VGA dan berlanjut ke pengukuran PSU (Power Supply Unit). Semuanya menunjukkan normal. Akhirnya saya beranikan diri untuk membongkar sendiri monitor LCD saya, meski agak ribet, tapi akan lebih memuaskan bila kita bisa merepair sendiri monitor daripada diserahkan ke tukang service yang belum tentu kerusakannya parah. Hal ini saya lakukan mengingat dulu pernah mereparasi TV ke tukang service di  daerah Gemolong, Sragen tetapi ternyata tidak ada komponen yang diganti, hanya pasang copot komponen, dan membersihkan PCB aja. Dah gitu, biayanya 30 ribu lagi, capex dee...


Indikasi kerusakan LCD Monitor Samsung 732NW :


Ketika dinyalakan, lampu power nyala tapi layar tidak bisa tampil gambarnya.


Cara Service LCD Monitor Samsung 732NW Mati :


1. Bongkar monitor LCD samsung 732NW tersebut dengan mencongkel menggunakan obeng minus tipis.    Hati2x dalam mencongkelnya agar lecetnya tidak parah, tapi pasti lecet.
Ini adalah satu-satunya cara untuk membuka LCD Samsung 732NW ini. Jadi monitor ini menggunakan sistem kait yg mengelilingi sisi body LCD Samsung 732NW ini.


2. Ambil Modul Power suplynya. Kerusakannya ada di bagian ini.


3. Perhatikan Elconya, Anda akan melihat ada elco yang melembung dibagian dekat trafo power suplynya.
4. Ganti Elco yang melembung ini dan Monitor LCD samsung 732NW siap di coba.

Kerusakan elco ini menyebabkan dropnya tegangan dari 5 volt menjadi sekitar 3 volt atau dari 12 volt menjadi sekitar 8-10 volt. Dengan tegangan yg drop seperti ini, maka tidak akan kuat untuk menyalakan screen LCD nya dan board LCDnya

NB : Komponen yang perlu diselidiki : C301, C113, C109, C110, D102

Labels: